Vitamins:
- 3 * Delrin V-wheel kit (openbuilds)
- 4 * M5 Round cap screws, 25mm long
- 4 * M5 nuts
RepRapped Parts :
- Wheel slider (https://github.com/paenian/bertha/blob/master/wheel_slider.stl)
- Rail effector (https://github.com/paenian/bertha/blob/master/rail_effector.stl)
Tools :
- 3mm Ball-end hex key
- Knife for part cleaning - exacto or similar

Assembly:
- Clean out the nut trap and cut away the onion skin from the Wheel Slider.
- Assemble the Delrin V-wheel kits - note, the metal shim goes between the bearings - it's not a washer. Don't put the nuts on yet.
- Insert the lock nut from one wheel kit into the Wheel Slider, then bolt on one of the wheels.
- Clean out the nut traps and cut away onions skins from the Rail Effector.
- Insert the other two lock nuts into the outermost nut traps
- Insert 4 nuts into the inner nut traps, two on the base and two for the wheel slider.


- Screw two round-head screws through the inner nut traps, all the way in. These are for attaching the syncromesh later.
- Insert and screw in the Wheel Slider. Screw down all the way.
- Insert and tighten the other two V-wheels.
- Test it on the rail! You'll likely need to adjust tension on the wheel slider.


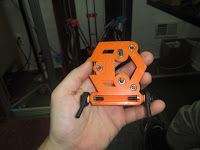
It should look like an android head. Note that you shouldn't install the IGUS ends yet.
Repeat for the other two assemblies.
No comments:
Post a Comment